WordPress VPS
WordPress VPS build- Description
- Instructions
- Support
A WordPress VPS is the perfect solution for hosting your WordPress website with maximum speed, security, and especially flexibility. With a pre-installed LEMP stack (Nginx, MySQL, PHP), this VPS offers a complete environment to immediately build and manage your website. Thanks to advanced configurations, such as automatic SSL certificates, phpMyAdmin for easy database management, and pre-installed WordPress plugins like Wordfence and SMTP Mailer, you are assured of optimal performance and security.
From blogs to corporate websites
With this VPS, you can easily launch your own website, whether you’re a beginner or an experienced user. Whether you’re running a small blog or a large corporate website, the WordPress VPS provides the speed and reliability you need to strengthen your online presence. Take advantage of the ability to work quickly and securely with WordPress and PHP thanks to a robust hosting environment.
Deploy your WordPress VPS now and enjoy super-fast performance, scalability, and complete control over your website. Prefer to keep it simple? Then go for our standard WordPress Hosting.
Features of WordPress VPS
- Ubuntu 24
- Nginx
- MySQL 8.3.X
- PHP 8.3.6
- PHPmyadmin
- WordPress
- wp-cli
- WordPress plugins: Easy WP SMTP and Wordfence Security
Useful to know
Connecting via SSH, here’s how you do it: https://hosting.nl/support/hoe-maak-ik-verbinding-met-mijn-vps/
Viewing the WordPress App in your web browser
Because a ‘self-signed’ SSL certificate is active, you will see an error message about this in your web browser. Don’t worry, it’s harmless. You will see an error message stating “Your connection is not private”.
- Click on ‘Help me understand’ and then on ‘Proceed to .. (unsafe)’ to continue.
- After the App has been deployed, go to https://the.ip.address.from.the.email in your web browser. Did you set up a domain name during deployment? In that case, change the DNS of your domain name to the.ip.address.from.the.email. After that, you can access WordPress in your web browser via https://yourdomain.name.
Send email
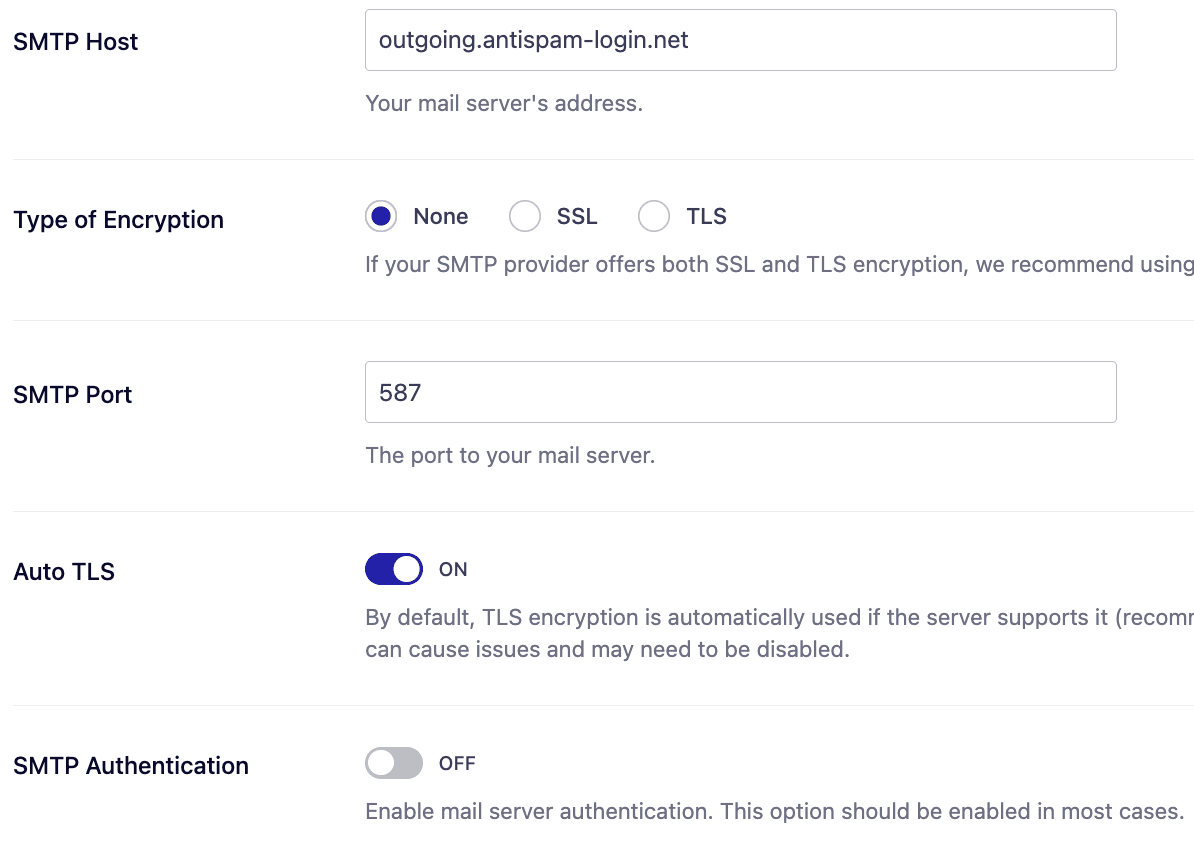
To allow WordPress to send emails, the Easy WP SMTP plugin needs to be configured. Here’s how you do it:
- In WordPress, go to Easy WP SMTP
- Select Other SMTP
- Set the SMTP Host to: outgoing.antispam-login.net
- Type of Encryption: TLS
- Set the SMTP port to: 587
- Turn off SMTP Authentication (Off)
Click on Save Settings to save the changes.
WordPress should now be able to send emails! You can test this using the Send a test link in WordPress.

Using MySQL
To use MySQL, first establish an SSH connection. Then execute the following command:
mysql -u root