Optimize images automatically
The size of images that are uploaded is usually not given much thought. Adding oversized images to the pages of your website means that when you visit your website, oversized images must also be loaded which results in slower loading time, poorer user experience and lower conversion.
Follow the steps in this article to automatically optimize and compress, old and new, images from your WordPress website so you never have to think about image size again. And with this, the loading time of your website will never again be negatively affected by large images.
Want to dive even deeper? You can. The steps below are a brief summary of this original English-language page.
Request a QUIC.cloud API key
To follow these steps, the ‘LiteSpeed Cache’ plugin must be installed.
- Log in to your WordPress Dashboard
- From the menu, go to ‘LiteSpeed Cache’ -> ‘General’ (Default Settings)
- Click ‘Request Domain Key’
wait a few minutes and then refresh this page.
![]()
Link your website to a QUIC.cloud account (not required)
An account is free but equally unnecessary. Only the API key created above is required.
Don’t want an account? Then proceed to the next step.
If you use our SuperFast Hosting and link your website you can automatically -and at no additional cost- use the QUIC.cloud LiteSpeed Enterprise features. You also get 10x more “credits” monthly compared to a standard free basic account.
Features you can use for free with an account: Fast queue serving image optimization, 10,000 image optimizations per month and a CDN with 6 PoPs.
You can find additional information about having an account here.
- Register an account at https://my.quic.cloud
- The orange “Link to QUIC.cloud” button is now available. Click this button.
Your website is now successfully linked to QUIC.cloud

Enable automatic optimization
- Log in to your WordPress Dashboard
- From the menu, go to ‘LiteSpeed Cache’ -> ‘Image Optimization’.
- After this, click on the Image Optimization Settings tab.
- Enable‘Auto Request Cron’ (Cron task for requests)
- Click ‘Save Changes’ to enable automatic optimization.
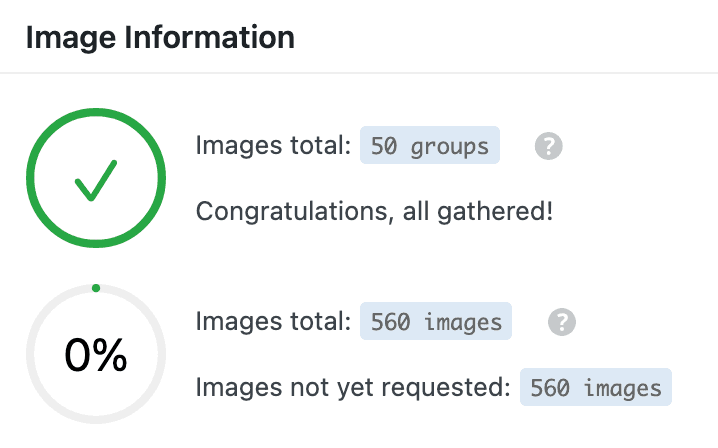
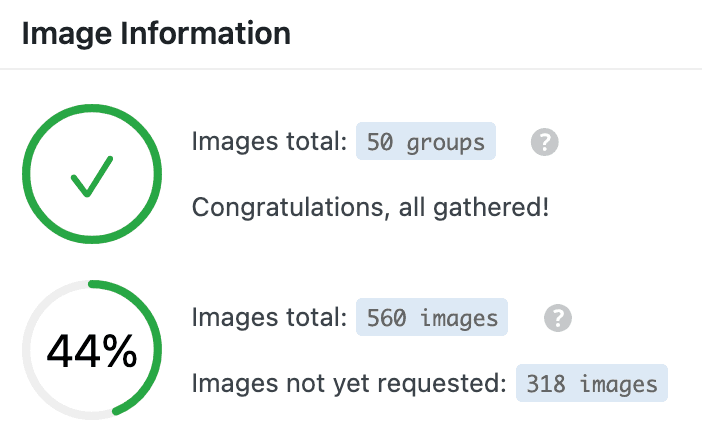
After five minutes, you will see that a start has been made to process and optimize the existing images.
Note: the first few optimizations go in small amounts to check that everything is working properly. This rises to 200 optimizations per request after half an hour.

Additional settings
There are other settings possible that you may want to tweak. For that, check the page ‘Page optimization’, tab sheet ‘Media settings’.
Do you also want to do something about image findability? Then read this article on search engine optimization by colleague Martijn.